Tuesday, March 29, 2011

Day 5 - Buttercream Icing


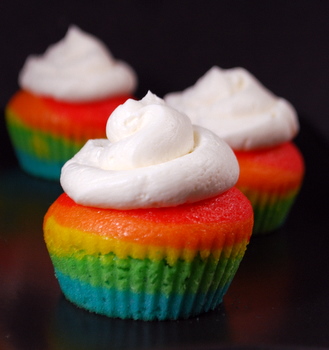
Well this is sort of an addition to my rainbow cupcakes recipe...cause seriously....whats a cupcake with out some ICING? Any who here's the recipe I have been using in the past!
---------------------------------------------------------------------------------------------------------

Ingredients-
  • 1/2 cup of solid shortening
  • 1/2 cup or 1 stick of softened butter of margarine
  • 1 tsp vanilla extract
  • 4 cups sifted powdered sugar
  • 2 tablespoons milk

    Directions -
    • In a large bowl, cream the softened butter and shortening with a hand mixer
    • Add Vanilla
    • Gradually pour in the powdered sugar (1/2 - 1 cup at a time)
    • Once well mixed, add in the milk until light and fluffy
    • Cover with a wet washcloth until ready to use
    ---------------------------------------------------------------------------------------------------------

    Note - Before milk is added, the icing will look dry and hard
    Note - For spreadable icing -- add 2 tablespoons  corn syrup
    Note - Keep refrigerated in an airtight container for up to 2 weeks
    Note - Re whip when reusing
    --------------------------------------------------------------------------------------------------------
    Recipe Copyright to Me
    Image Copyright to TipDeck

    Monday, March 28, 2011

    Day 3 - Mug Cozy


    A cute and "cozy" mug warmer, perfect for one of those frosty days! Crocheted obviously and definitely a project added to my q once I get enough time to go out and buy some more yarn -- happy crafting
    ------------------------------------------------------------------------------------------------------------

    Image Copyright to - Finvara @ Deviantart

    Day 2 - Rainbow Cupcakes


    Introducing one of the most long awaited recipe requests I have gotten in a while. These delectable, cute, small, and utterly colorful cupcakes are sure to make a great treat. I hope you enjoy and I apologize in advance for the humongous post this is going to be :)

    -----------------------------------------------------------------------------------------------

    Ingredients --
    • 1 Box of White Cake Mix
    • 3 eggs
    • 1/4 vegetable oil
    • 1 cup water
    • Assortment of Gel Food Coloring (in all colors)
    • Homemade icing (optional)

    Directions --
    • Preheat your oven to the needed temperature ; 375
    • In a large bowl prepare the cake mix as stated on the box
    • Gather together 6 bowls, 6 spoons(one for each color), and your food coloring
    • Evenly distribute the cake batter amongst the 6 bowls using a measuring cup or spoon
    • In each bowl squeeze an equal amount of food coloring (one color per bowl)
    • For the orange: mix 3 drops yellow with 1 drop red
    • For the purple: mix 3 drops blue and 2 drops red
    • Stir each bowl until all the bowls are the desired color
    • In a lined muffin pan spoon in the colors in backwards order of the rainbow
    • purple, blue, green, yellow, orange, red ; forming layers of color
    • Bake as stated on the box
    • Let cool and top with homemade icing (optional)
    -------------------------------------------------------------------------------------------------

    Note - for petite cupcakes use a mini muffin pan and smaller amount of batter
    Note - Use caution when mixing the purple ; it can get very yucky
    Note - FEEL FREE to make your own batter -- i was just being lazy
    Note - Although gel food coloring works the best; liquid is fine too
    Note- Don't forget to cut it open and see the rainbow!

    -------------------------------------------------------------------------------------------------
    Recipe copyright to me
    Image copyright to BakingBites

    Day 1 - Pop Tab Bracelets


    I recently found this on the web and thought it was a just such a creative idea. Recycling our everyday pop tabs into functional and colorful pieces of jewlery. This is a perfect craft for ....well anyone really... especially those crafty at heart types of people!


    Step 1 - Gather 8-10 STANDARD pop tabs (depends on the size you need)

    Step 2 - Find a coloful/printed ribbon you will use for the "bracelet"

    Step 3 - Using one pop tab weave the ribbon through the two wholes (like shown)

    Step 4 - Repeat this weaving step until you have the desired length

    Step 5 - Using a paperclip or safetypin, bend it around the bracelet ends until connected

    Step 6 - OR tie the ribbon in a bow OR add a small bead to the end of the ribbon

    -------------------------------------------------------------------------------------------------
    Note- Colored pop tabs make this craft even better!

    Note - Make sure the pop tabs are clean and facing smooth side out

    Note - There are endless ways to make these ; so get creative and experiment

    -------------------------------------------------------------------------------------------------